Silhouette Cameo 3 Made Easy!
So you’ve gotten a Silhouette Cameo 3? Congratulations, craft cutters are wonderful machines!
However, if you’ve never used one before, they can feel a bit intimating. We’ll walk you through the basics of using your Silhouette 3 without a mat and pressing your first shirt.

So you’ve gotten a Silhouette Cameo 3? Congratulations, craft cutters are wonderful machines! They open up the door to many fun and exciting projects. With your craft cutter and heat transfer vinyl like ThermoFlex® Plus, the possibilities are endless!
However, if you’ve never used one before, they can feel a bit intimating. Don’t worry, we’re here to help! We’ll walk you through the basics of using your Silhouette 3 without a mat and pressing your first shirt. Let’s get started!
Silhouette Cameo 3 Made Easy!
Skill Level: Beginner
Supplies Needed:
- Silhouette Cameo 3
- Computer
- Cut File (Get this one for free here!)
- ThermoFlex® Plus (Here we used Dark Gold)
- Shirt
- Heat Press (A heat press ensures even heat and pressure. We’ll talk about this more soon!)
Step 1: Load Up Your Heat Transfer Vinyl
We’re going to start this guide assuming you’ve already unboxed your Silhouette 3, plugged it into your computer, and installed Silhouette Studio. If you haven’t installed Silhouette Studio yet, download it here!
You’re also going to need heat transfer vinyl for this project. We’re using ThermoFlex® Plus as it’s the best in the business and makes for durable, beautiful shirts. If you haven’t tried ThermoFlex® Plus yet, click here to request a sample! If you’d like help finding a distributor to buy from, click here!
We’re going to start by loading our material into our Silhouette. Start by making sure the small lever (the release lever) on the right hand side inside the machine is in the up position.
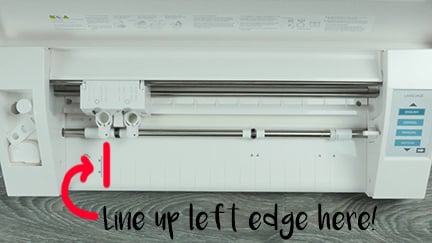
To load your material, start by lining its left edge up with the line on the left hand side of the machine.
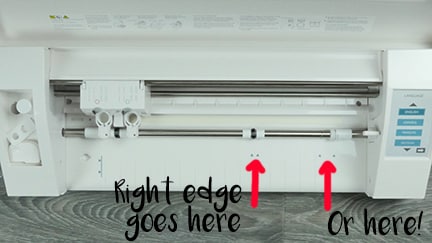
Your right edge should reach one of the other two rollers highlighted here. There are arrows to point you to the right place to put your edge.
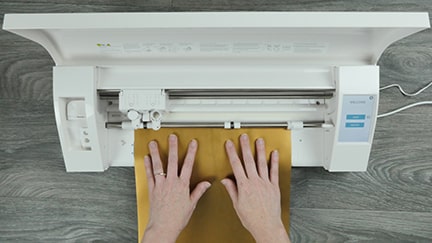
Now that we know where to put our sheet in, time to load it in! Make sure the shiny side is loaded down then press “Load” on your machine.
We do that because the shiny side is called the carrier- we want to cut into the material because that’s what is going to go on your shirt. The carrier keeps everything in place and is removed later.
Step 2: Get Ready to Cut in Silhouette Studio
Once we’ve got our material ready to go, it’s time to get Silhouette Studio ready to cut! Make sure you’ve got a file you want to cut- for this project we’re using a free cut file you can get here.
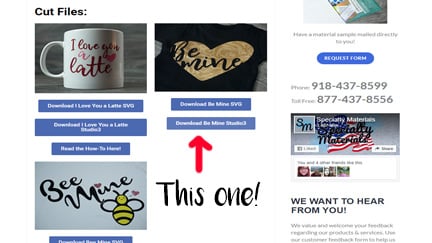
We even have this file ready to go as a Studio3 file, which is a type of file your Silhouette Studio can open.
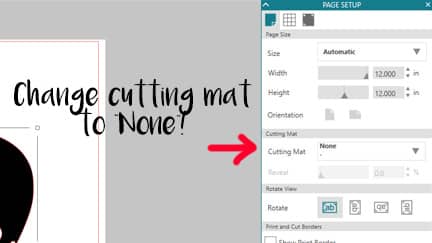
For this how-to we’re showing you how to this without the cutting mat, so make sure to change your cutting mat settings to “None”.
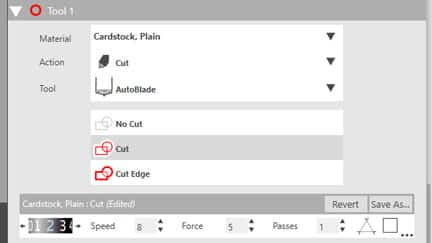
Next click over to the “Send” tab. That’s at the top right hand corner. Here is where you set up your cut settings. For ThermoFlex® Plus, start with:
- Blade : 2
- Speed : 8
- Force : 5
- Passes : 1
Step 3: Test Cut! Test Cut! Test Cut!
This is perhaps the most important thing to take from this how-to, which is why we said it three times! It doesn’t matter if it’s your first project or your 1000th, ALWAYS do a test cut.
Why do we do a test cut? It’s to make sure the cut settings work for your material. Small things can throw off your cut- your blade can get dull, your machine might not be using as much force as others, etc. Doing a test cut ensures that if there’s an issue, you can adjust. It will save you so much material in the long run!
You’ll find “Test” right next to “Send” at the bottom of your screen. Let’s test our settings before we go any further!
A test cut is a square box with a triangle in the middle. Weed (remove excess material) the square away from the triangle. A good cut should look like this!
If your cut doesn’t look like this, that means you need to adjust your cut settings. Is it too shallow? Adjust the blade and force. Does your design have a lot of detail and it didn’t get all of the detail very well? Slow down the speed. That’s what the test cut is for!

Load your material back into the machine once you have that perfect test cut. Make sure your material covers the entire cut strip!
Step 4: Cut Your Design
Are you excited? You should be! We’re at the part where you get to see your design come alive! It’s time to cut the design out.
First, make sure your image is sized correctly. Measure your shirt and decide how big you want the image to be. We sized ours to be about 10.5″ wide.
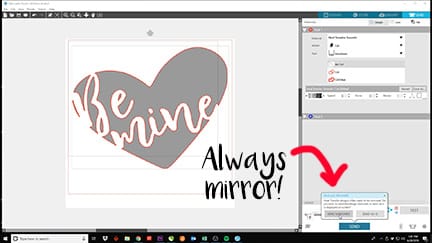
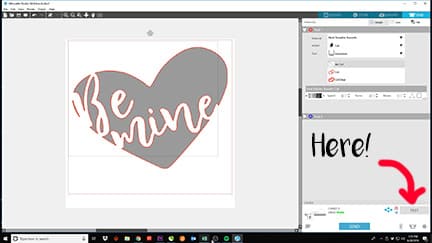
Now, click the “Send” button. Important note: it’s going to ask you if you want to mirror your design. Always mirror your design when cutting this way without a mat. Things like sticker vinyl do not need to be mirrored but most heat transfer vinyl does.
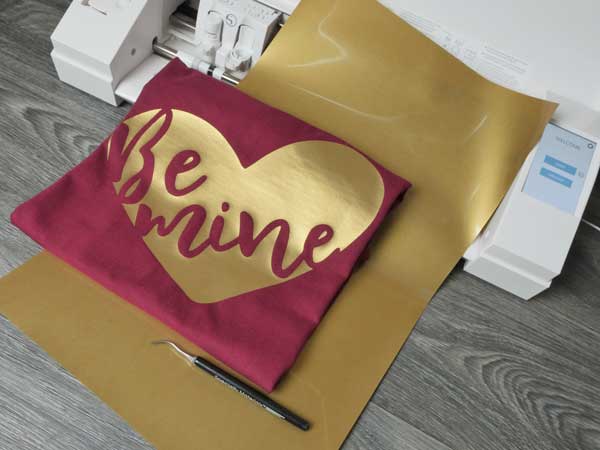
Once it’s done cutting, unload the material and weed away the excess. You’ve got your design, ready to press!
Step 5: Press Your Design
Get out that heat press, it’s time to finish this project!
Many of you may be asking, what about hand irons? If you’re just starting out, hand irons are a good way to get acquainted with heat transfer vinyl. However, a heat press is going to be the best thing to use. Why? Well,
- A heat press has uniform pressure- you won’t get the same level, even pressure pressing down with a hand iron
- A heat press has consistent, even heat.
If you don’t have even pressure or heat, there’s a good chance your design is not going to be looking good in a few washes. When applied with the right pressure and heat, ThermoFlex® Plus will OUTLIVE the life of your garment. Let’s say that again, OUTLIVE. That is why heat and pressure are so important to get right!
If you do use a hand iron, we recommend using ThermoFlex® Turbo. It requires lower heat and time, making it a better fit for hand irons. Please make sure to use a PTFE sheet when pressing with a hand iron. Press down hard as you can when pressing.
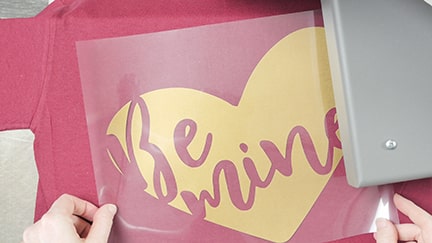
Heat your press up to 320° F, cover your design with a PTFE sheet, and press for 15 seconds at medium pressure. Peel that carrier warm and boom! We’re done!
With that, you’ve made a custom shirt using your Silhouette Cameo 3! We hope that this makes you excited to try more projects. Heat transfer vinyl can go on more than just shirts- hats, pillows, capes, aprons, bags, shoes- the possibilities are endless! Just remember to check that the material you have is compatible with what you want to press on and that it can take the heat.
Questions? Comments? Message us over on Facebook and we’re happy to help! If you use this file and you upload pictures, please tag them #lovewhatupress! We always love seeing what you make with our products.
We hope this has been helpful and informative. As always,
Love what you press! ®
Want to see this guide in video form? Check out our video below!

Disclaimer: Specialty Materials & Digital Decoration, LLC is not associated with Silhouette America.
Like this blog post? Share it with friends!
Subscribe to our Mailing List
Want to be in the know about our latest products and colors? Sign up for our mailing list!